
FormBuilder
FormBuilder eases data conversion and capture by allowing operators to create custom input forms that resemble existing manual input forms.
|
The process for using FormBuilder is as follows: Step 1: Build forms to get manual data into the systems database that will drive your KPIs |
|
|
Data can be entered directly into the Pani platform or printed out for hard-copy data acquisition. This minimizes or eliminates staff training for data capture/entry. Forms can also be grouped in Folders, allowing for better organization, or grouping of forms by input type (lab reports, sensors, etc.).
Create a new form
- Select the "Create new Form" button at the bottom of the screen.
- Give the form a name.
- Set the data entry interval. If the form has multiple time frames, select the longest period for a particular field as the Data Entry field (if you have daily and hourly readings, select Daily).
Once the form is created, it is time to populate the form with fields. Fields define characteristics of the device used to provide form data. Often these are plant sensors which can be devices or dials read by operators, lab readings/report fields, etc.
|
|
Input Fields: Creating a Sensor
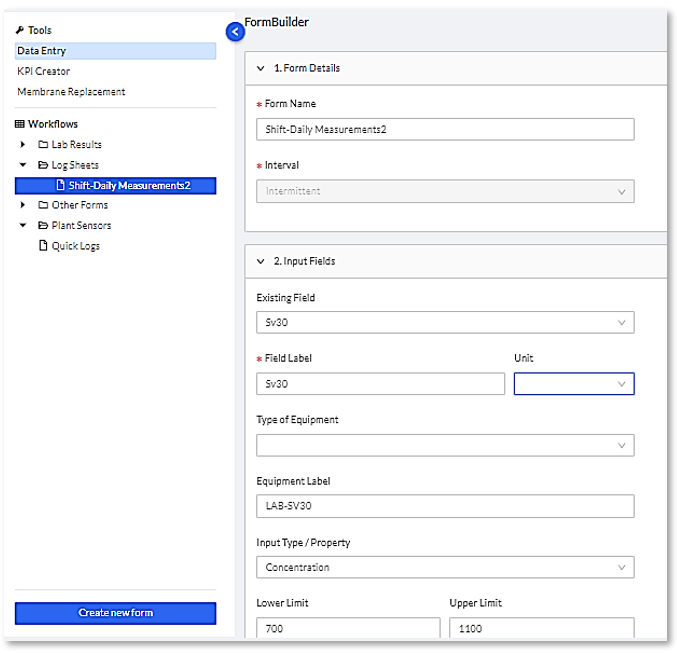
Input fields on a form are based on sensor readings you take at the plant. Sensors and their associated data/readings are used to create KPIs and drive the various reporting features of the Pani platform.
- Enter in the Field Label. This label is used exclusively by the Form to guide operators and technicians on where to enter data. Types of equipment include membrane components, various tanks, pumps, diffusers, etc.
- Enter the Units of measure. There are dozens of unit types to choose from. If you are working with something that has no Units (like pH), you will have to declare no units for the entry. Do this by selecting the dash ( - ) which will signify no units.
|
|
- Select the Type of equipment that this measurement or reading will come from (pump, temperature, flow meter, etc.). Again, type a few letters of the equipment’s name, pump, for example, to quickly find the correct equipment type.
- Enter an Equipment label. This label can be the same as a field label or can be something like an asset tag name or detailed description of the asset.
- Enter an Input Type/Property. Things like pressure, conductivity, salt passage, production, consumption, etc., can be entered in here.
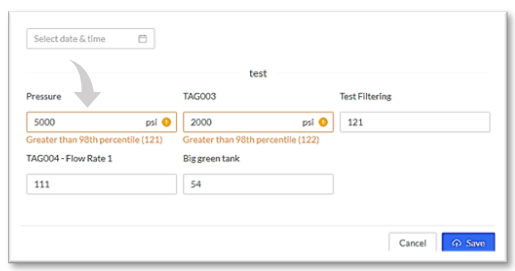
- Select the upper and lower limits for the Input Property. These limits do not necessarily have to be manufacturing limits, rather these can be measurement limits. These limits are used to ensure accurate data entry. For example, if you set the lower limit on an Input Property to 100, and the upper limit to 500, if an operator tries to enter a value of 5000 into the field, they will receive an error. The information will still be entered into the form, but the operator has been advised that the reading is outside of the prescribed limits.
|
|
7. Once the input fields have been configured, select the “Add field to form” button. This will generate a preview of what the form will look like. You can edit the field if something is wrong or click on the “Save Form” button in the upper right-hand corner of the screen to save the form.
|
|
Keep adding sensors and fields until your form is complete. New sensors are added to the end of the current form, whether you are adding a new sensor during form creation or adding a new sensor using the EDIT feature. This is done to preserve data integrity if new fields are added. Save the form when you have finished entering in all fields and are happy with the layout. Forms can be saved into distinct folders, or directly to the main screen by selecting the “Don’t add to folder” option. The form will appear in the left-hand menu where you can choose to fill it out, print it, or save it as a PDF to send to someone else.
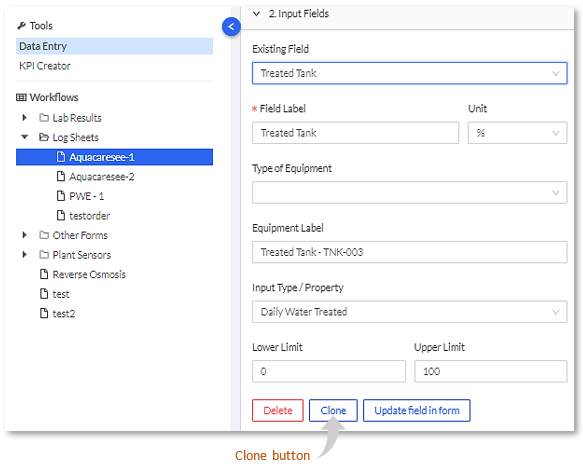
Clone Form fields/sensors
It is possible to create fields based on previously created fields. For example, if an operator is taking multiple tank readings and all the tanks have similar units of measure, rather than create each tank individually it is possible to clone all the parameters and quickly edit them to create a new form field. To clone a form field:
- Open the form containing the field you wish to clone.
|
|
- click on the Input Fields option and then click on the Existing Field box. A list of the existing fields on the form will appear.
- Select the field that you wish to clone. All the field’s data will now appear on the page.
- Press the Clone button. The word “-copy” will be added to the Field Label.
- Edit the Field Name, Equipment Label and any other information to describe the new field or Sensor.
- Save the new field to the form.
- Save the form.
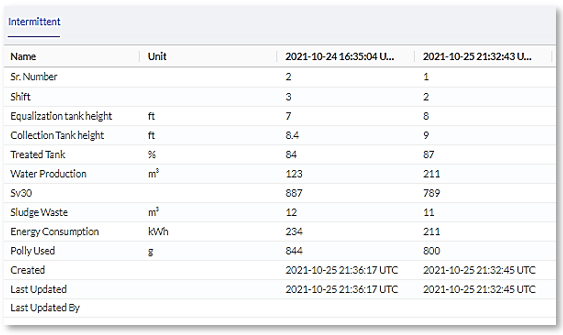
The Transpose function
The default view shows dates along the left-hand side of the forms and sensors/reading across the top. Use the Transpose button (double arrows) to switch between dates down the side and across the top.

To fill out a form, select the form from the left-hand menu. This will bring up the form. Press the “Add Data” button to view the form entry screen. The Form Entry screen will save the form when completed. Upon saving, form data is written to the Pani Digital database and all graphs and tables in the platform will be updated with the new data.
|
|
Just as with Log Sheet and Quick Log entries, you can edit data within the form by double clicking on the form entry. All data entries and edits are captured in the system and can be reviewed by management should entry errors or deletions occur.
|
|
Edit a sensor/form field
Sensors, and their properties within a form, can be edited to change any of their values such as limits or tag information. To edit a sensor or form field:
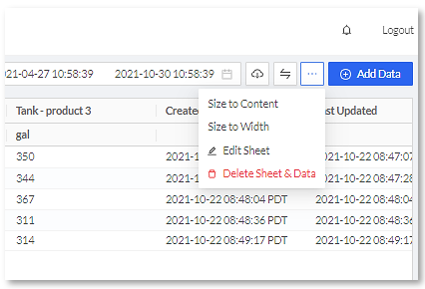
- Select Edit Sheet from the 3-dot icon in the menu bar.
- Open the Input Fields drop down, click on the Existing Field box and select the sensor or field you wish to edit.
Change the values as needed and when finished, click the "Update field in form" button at the bottom, then "Save Form" at the top right corner of the main screen.

