
Introduction to the Platform
Pani ZED™ Guide and Consult are built on the concept of “digital twin” (DT) technology. Guide creates a model of the plant (DT2), and Consult creates a full digital simulation of the plant (DT3). The DT3 model in Consult allows a water treatment operations specific artificial intelligence (Ops AI) to run simulations alongside of the real plant and analyze discrepancies between the model and actual plant operations. This enables ZED's Ops AI to accurately predict issues that affect plant operations and prescribe actions to keep the plant in compliance, to save energy and to maximize plant performance.
The Data Page
The "Data" page allows plant operators and administrators to capture manual data regarding plant operations. Additionally, the "Data" page is where much of the plant’s reporting and sensor data is set up and consists of Workflows/Log Sheets, Forms and KPIs.
What's covered in this section of the tutorial:
- How to add or modify your Normalization Reference data to existing forms
- How to add or modify Water Analysis data to existing forms
How to Add/Modify Normalization Reference Data:
1. Login to the platform with your corresponding username and password. Once you are logged in, you will select the plant from the dashboard you wish to modify.
2. Select the "Data" page from the top menu. In the left side menu, look through the various Workflows folders (e.g. Log Sheets) for a "Normalization References" folder. Options may vary here, depending on the plant’s configuration. If you do not find a folder for Normalization References, feel free to reach out to [email protected] to request assistance.
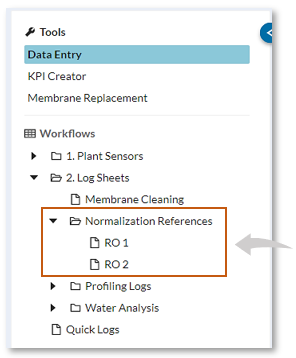
3. Click on one of the Normalization Reference forms, in this example RO1 is selected. The form will launch on the main screen. Here, you will be able to see the Normalization Reference tags that are setup for your plant. Click on the "Add Data" tab to add data.

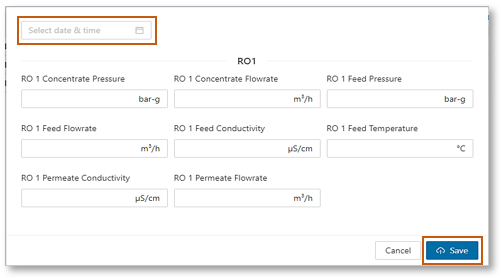
The page below will pop up to manually add Normalization References. Select the date & time you wish to add, and manually input the data. Click "Save" once it is done. There is also an option to upload data via "CSV Upload" which can be found when clicking the button beside "Add Data" button.
4. Once the data is added, it should be available to view and edit. To edit an existing data, double click on the data you would want to modify, apply the changes, then click "Save".

5. The data can be imported (if needed) by clicking the ![]() button and choosing "CSV Upload".
button and choosing "CSV Upload".
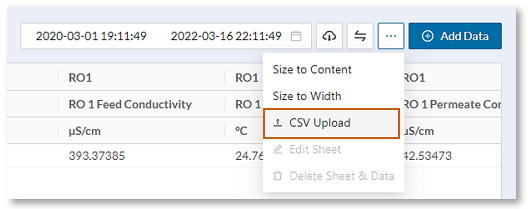
- For additional information on importing data using CSV Upload click here 🖱.
How to Add/Modify Water Analysis Data:
1. Login to the platform with your corresponding username and password. Once you are logged in, you will select the plant from the dashboard you wish to modify.
2. Select the "Data" page from the menu. In the left side menu, under Workflows, look for a "Water Analysis" folder. Depending on the plant’s configuration, the options may vary.
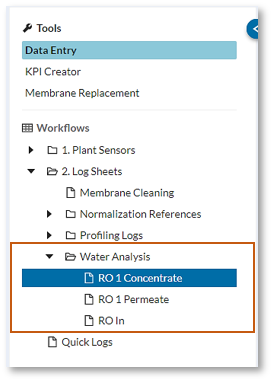
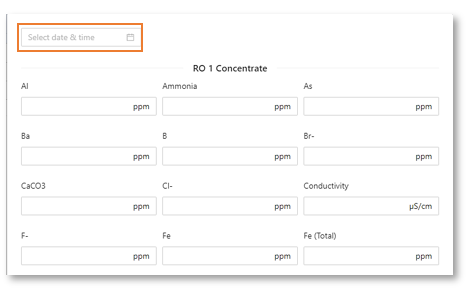
3. Once you click on the Water Analysis folder and select the form you want to modify, in this example, we will use the RO 1 Concentrate. The form will launch on the main screen. Here, you will be able to see the RO 1 Concentrate sensors that are setup for your plant. Click on the "Add Data" button to add data.

The page below will pop up to manually add data. Select the date & time you wish to add, and manually input the data. Click "Save" once you are done. There is also an option to upload data via "CSV Upload" which can be found when clicking the button beside "Add Data".
4. Once the data is added, it should be available to view and edit. To edit an existing data, double click on the data you would want to modify, apply the changes, then click "Save".
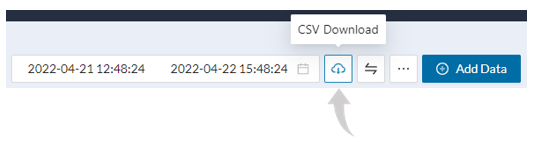
5. The data can be exported (if needed) by clicking the cloud ![]() "CSV Download" button .
"CSV Download" button .
- for additional information on exporting data to a CSV file click here 🖱.
- for additional information on The Data page, tools and workflow click here 🖱.
Time to review what was covered before moving on to the next section
- We added and saved data to one of our existing Normalization Reference data forms
- We modified and saved data to one of our Water Analysis data forms
The Analytics Page
Analytics provides system-specific diagnostic tools to monitor and evaluate process and asset statuses, equipment degradation, and plant performance.
We will discuss the Tools used in the "Analytics" page which are defined groups of KPIs, graphs and displays that provide information to the user on plant performance and operations.
What's covered in this section of the tutorial:
- How to use the Overview Tool
- About other wastewater tools
While some of the Tools mentioned here may or may not be included with your particular plants configuration or topology, The Overview Tool will always be present, so lets start with it.
How to use the Overview Tool:
1. Login to the platform with your corresponding username and password. Once you are logged in, select the "Analytics" page in the top menu.
2. By selecting "Overview" in the sidebar, you will see the overall status, performance, and operation of your plant.
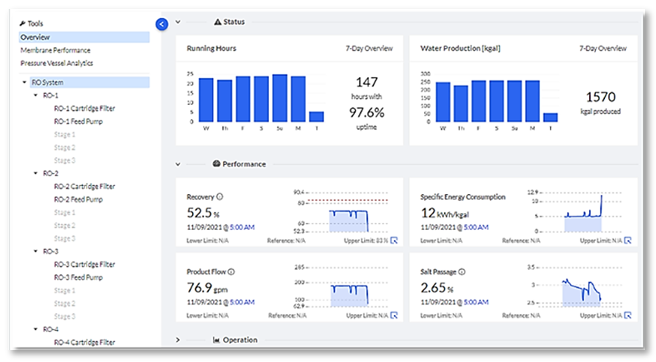
3. In the example above RO System was selected, allowing use to see the overall system.
4. Move your mouse cursor over one of the graphs to display the actual readings on the graph.
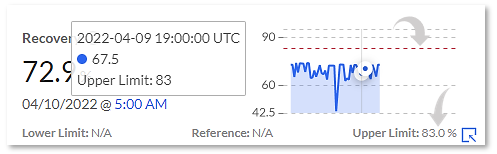
4. The above example displays an upper limit (red dotted line) of 83% set for this Recovery graph, with reading of 67.5% being shown on the timeline for that specific date and time.
5. You can further drill down for additional information by clicking on ![]() in the corner of the selected graph.
in the corner of the selected graph.
6. Clicking on the various tabs, for instance selecting RO Cartridge Filter, will present its status, performance, and operation graphs.
Other Analytic Tools:
Other tools such as Membrane Performance used to perform diagnostics on cleaning metrics, Pressure Vessel Analytics provides the ability to manage the membranes, optimize replacements, and improve servicing and troubleshooting. These and other specific wastewater tools may or may not be included with your plant. And therefore not discussed here. Contact Pani Support to inquire about the tools available to your specific implementation.
- for additional information on Analytics click here 🖱.
Lets review what was covered before moving on to the next section
- We discussed the Overview Tool and how it is used in Analytics
- We briefly mentioned some other Tools that may be available
Insights & The Notifications Page
Insights are a type of notification (also considered a "resource" within the Pani system) that are Pani generated and sent to the operations team when Pani Zed™ detects something that requires attention. Insights are different from regular user-generated Alerts because they are configured by Pani system and incorporate more operational data (using Ops AI) to provide more detailed responses, like prescriptive action as well as suggestions on possible root causes.
How to Create Insights
Since Insights are Pani system generated, a user cannot create Insights. However, there may be situations where a user might want to create custom alerts to mimic Insights to a simpler extent, as alerts are restricted to a single variable/thresholds whereas Insights can have 2 or more input variables. This may also be helpful to complement or add some customization to Insights already present. In this case, the user can create regular alerts using the Alert Builder tool in the left menu of the Notifications page.
What's covered in this section of the tutorial:
- How to create an Insight with the Alert Builder function
How to Create Alerts using the Alert Builder:
1. Login to the platform with your corresponding username and password. Once you are logged in, you will select the plant from the dashboard you wish to add a basic Alert to.
2. Select the "Notifications" page from the menu and locate the "Alert Builder" tool on the sidebar. Depending on the plant’s configuration, the options may vary.
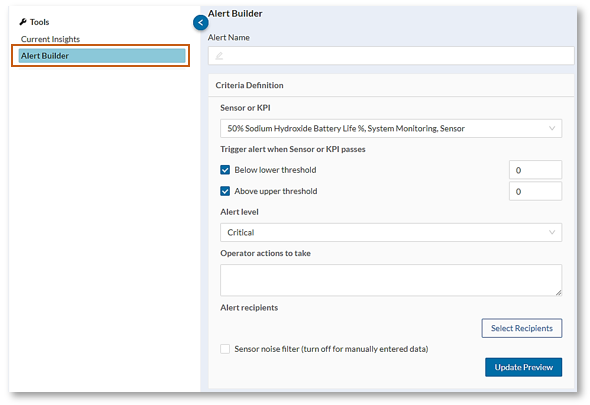
3. Provide an Alert Name and choose the Sensor or KPI you want to provide limits for. You can provide the upper or lower threshold or both, determining when the alert will trigger. You also have an option to specify the Alert level to Critical, Warning, or Informational, depending on the importance of the limits provided. Then you can add the necessary assignees to receive the email for the alert. When all the details are added, hit the "Save" button in the upper right part of the screen.
- for additional information on creating Alerts click here 🖱.
Lets review what was covered before moving on to the next section
- We created an Insight with the Alert Builder function providing us with a means to complement Insights already included
The Forecasting Page
Pani’s Forecasting feature is a service prediction tool that informs the user and the operations team when service is required for a particular asset, such as a membrane skid. This includes membrane cleaning and replacement.
Forecasting predicts the number of days until a specific threshold is reached indicating the need for servicing. It also informs the user of the consequences if servicing is not performed. This allows the operations team to balance potential conflicts between servicing an asset and lost production.
What's covered in this section of the tutorial:
- How to change settings on Forecasting Feature
How to Change Settings on Forecasting Feature:
1. Login to the platform with your corresponding username and password. Once you are logged in, you will select the plant from the dashboard you wish to change the settings to.
2. Select the "Forecasting" feature from the top menu.
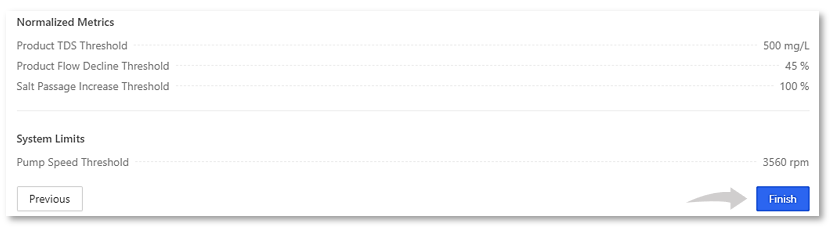
3. Select the "Forecasting" case you want to edit and click the "Settings" button
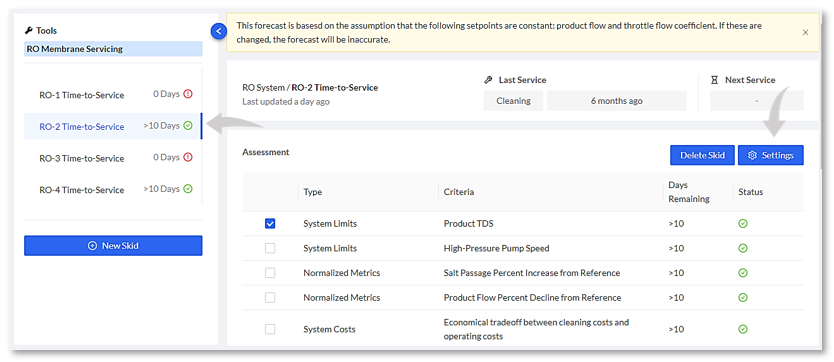
4. Apply the changes to settings and click the "Finish" button once done.
- for additional information on the Forecasting Feature click here 🖱.
The Optimization Page
The Optimization page is comprised of sections dedicated to a plant’s specific topology and technology. Optimizations are built on algorithms that use all data in the platform to project more optimal setpoints compared to where the operation is currently.
There are two main tools in the Optimization feature: Playbook and Plant-Specific Optimizations
What's covered in this section of the tutorial:
- How to setup Playbook Studies
How to Setup Playbook Studies:
1. Login to the platform with your corresponding username and password. Once you are logged in, you will select the plant from the dashboard you wish to modify.
2. Select the "Optimization" page from the menu and locate the "Playbook" tab on the left side. Create a "Study Group" (e.g., Maximum Recovery, Minimum Salt Passage, etc.), using the "Add Study Group" button.

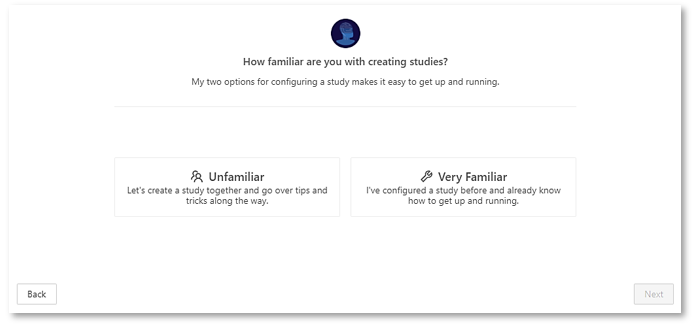
3. Once you have created a study group, you can easily create a case study. You have an option to select Unfamiliar that comes with a thorough step by step and helpful notes which would be beneficial for the first few studies. Once you are familiar with the process, it would be efficient to use the Very Familiar option.
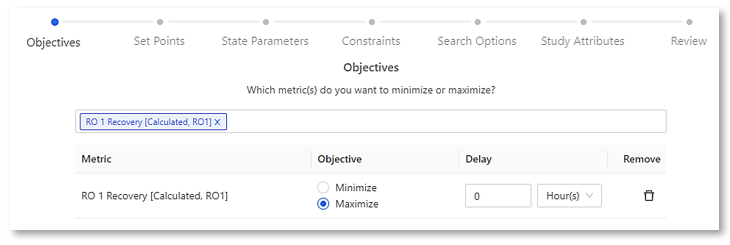
4. Select the KPI/s you wish to maximize/minimize. Delay is a shift you want to apply to the selected KPI parameter/s. However, this only applies to biological processes where certain measurements may lag behind other parameters. For RO processes, we will just leave it at ‘0’ because of its rapid process reaction.
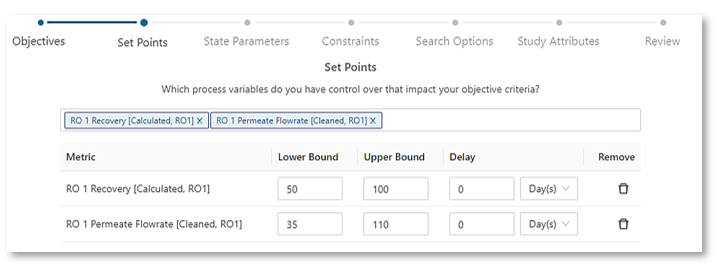
5. Select the sensor/s or KPI/s Set Points. Set points are variables that can be adjusted to obtain the desired optimization. For instance, in this example, the Playbook case study may recommend modifying the Permeate Flowrate to maximize Recovery. It is important to set the Lower Bound and Upper Bound to avoid irrational and inefficient recommendations.
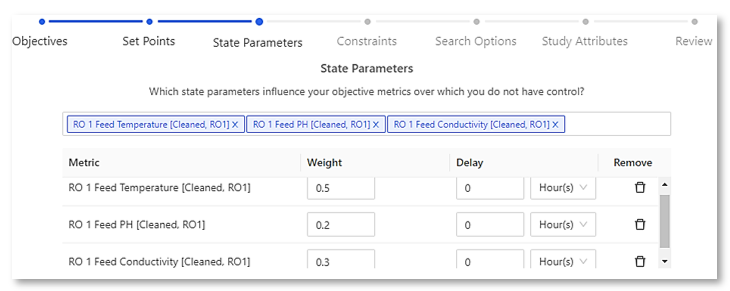
6. Select the sensor/s or KPI/s State Parameters. State parameters are variables that cannot be modified such as temperature and pH value. You will also need to provide a Weight for each variable. Weight represents the importance of each state parameter chosen. In this example, the Feed Temperature would have the overall weight of 50%. However, if all the state parameters are equally important, it is possible to put the weight as ‘1’ for all the variables.
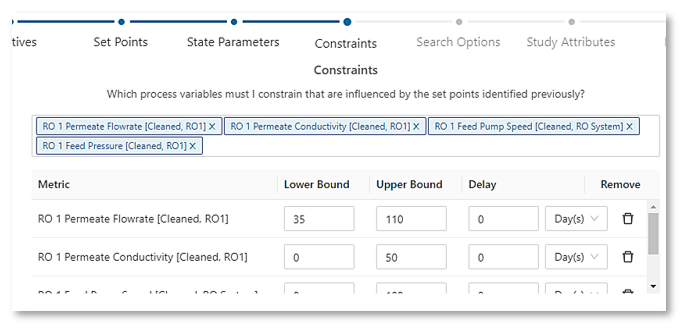
7. Select the sensor/s or KPI/s Constraints. Constraints are variables that helps limit the amount of effective studies calculated by the Playbook. For instance, in this case, having the permeate flowrate above 110 m3/hr and below 35 m3/hr would be inefficient for the plant. Therefore, you would add this as a constraint and the Playbook would not recommend studies where the permeate flowrate would fall out of the specified range.
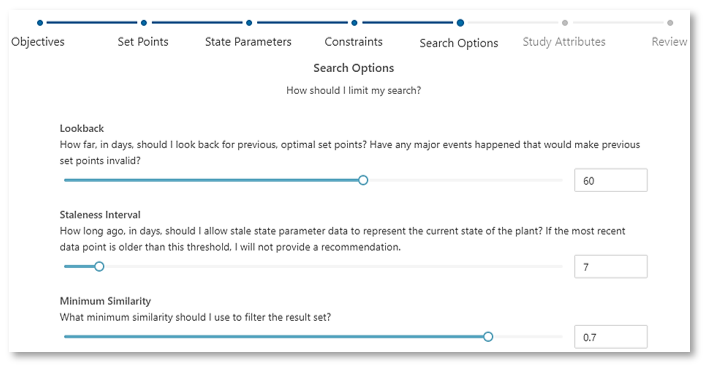
8. Provide the Lookback, Staleness Interval, and Minimum Similarity. In this example, the Playbook will look back on 60 days of historical data, with a maximum of 7-day gap between the last data available and the moment the study will run, and with data points of 70% similarity.
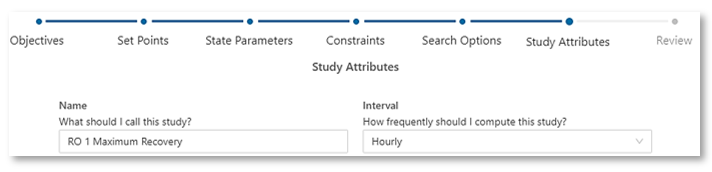
9. Name the case study and provide the frequency you want the studies to be calculated.
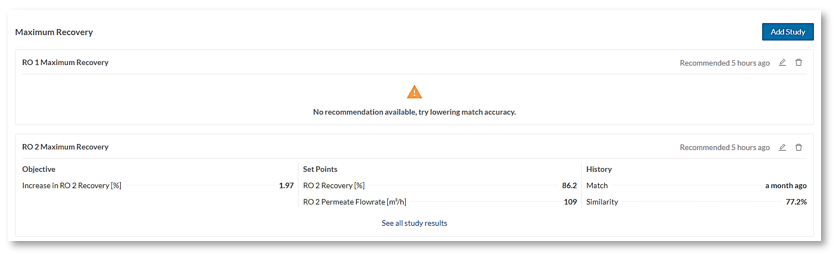
10. Once the studies have been setup, you will be able to view the results of the case study.
11. To edit a case study, select the option and click "Save".

- for additional information on Creating a Playbook Study click here 🖱.
- for additional information on The Optimization page click here 🖱.

